I’ve been working on this “dome-in-the-walk-in-area” concept, and I think that I have something now.
 The idea is to have a nice group walk-in camp. At this camp, I’d like a community meeting area that is out of the sun, dust, wind (and possibly rain), similar in purpose to the dining/meeting tent that I had in Nepal in 1988, but extended to allow room for cooking and general lounging. Being in the walk-in area actually will help with the dust problem, but still there will be adequate quantities of both wind and sun, and so a nice ‘n’ big tent is desired. I’m looking at the dome concept in part because I just like the appearance, and because the math is fun.
Edges
After a walk through Orchard Supply Hardware, recording the cost of everything that possibly could be used for a dome structure, I’ve come to a conclusion:
Kiln-dried hemlock fir 2×4 studs that have been ripped lengthwise are the best construction material to use for the dome edges. After considering slotted angle iron, hardwood closet rods, EMT electrical tubing, PVC irrigation pipe, and cheap 2×2 furring strips, I shouldn’t have been surprised that a construction material that is intended to be used in structures would be the best choice for building a structure, considering the cost-per-strength factor. Enough studs for a 26′ diameter dome is only a bit over $100. PVC pipe is 3x that; EMT tubing is 4x or 8x. Details
I am aware of the idea of using PVC pipe and rope connections, but I’d like a smoother frame to reduce stress and snags on the covering fabric. Besides, look above! Wood is cheaper! I’m aware that wood probably is heavier, but I expect that ripped 2×4 studs will take less area in the truck than PVC pipe. And besides, kiln-dried hemlock fir really is a pretty light lumber.
To confirm that ripped studs have sufficient strength, I intend to do a test to destruction of the top four contenders: 2×4 studs, ripped 2×4 studs, PVC pipe, and EMT tubing. Unless the results show that studs or ripped studs are not as “studly” as PVC and EMT, which would be a surprise, I think that I have a winner.
Vertices
Laziness guided my choice of vertex. Each edge just touches the imaginary hemisphere that surrounds the dome structure. The idea is to bevel each edge by an appropriate amount, and then attach each edge’s end to a plate that is taking the place of the hemispherical surface.
At this point, there seems to be a problem. Imagine assembling a dome one edge at a time. Half-attached edges rotate and split under their own weight. That PVC-and-rope approach is looking better!
 Here’s where assembly is considered. The dome is constructed from six pentagons. It would be wonderful to pre-assemble these pentagons first, and then attach the pentagons together, but any other dome structure requires you to take apart the already assembled outer pentagon vertices in order to merge them together! This requirement entirely eliminates any benefit that one gets from the initial pentagonal pre-assembly.
 So instead of connecting the perimeters of the pentagons using “6-Plates,” split the 6-plates in half so that the pentagons’ vertices don’t need to be undone for the final mergification! Then each pentagon is constructed using one 5-Plate and five 3-Plates, and the six pentagons are merged by bolting the 3-Plate corners together, “no disassembly required!”
The bottom edges of the pentagons need to be attached to the ground, and this is easy, too. It turns out that the 3-Plates at the base of the dome are perpendicular to the ground! (Remember that these plates take the place of the ideal hemispherical surface that surrounds the dome, which of course is vertical at the ground.) So two ideas come to mind. One is to drive rebar into an angle iron, and attach the 3-Plate to the part of the angle iron that sticks up. The second idea is to attach an entire 2×4 to the ground (five of them actually, between the pentagons at the base). Then attach the pentagons to strips of metal at the 2×4’s ends.
I’m considering this second idea because, instead of rebar, one can use the same kind of spikes that are used to tie down airplanes at the airport. See FlyTies. These spikes are driven through pre-drilled holes in the 2×4’s at an angle. The advantage of using these spikes with 2×4’s is twofold: the collection of angled spikes hold just as well as rebar (but are easier to remove) and the 2×4’s might be needed anyway to help control the cover of the dome at the ground.
Cover
There are many ways to cover the dome’s frame, and there are just as many trade-offs.
 Tarps protect from the rain, but they also cause an oven-like effect during the day. So we’d be out of the sun, but we’d still be baked! Of course we could let the bottom edge of the tarp flap in the wind, to let air in, but then we wouldn’t be protected from the wind or dust. So with tarps, we’re either baked or dusted. I’m not a real fan of tarps.
Greenhouse shade fabric 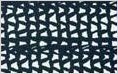 protects from sun, wind, and dust, but not from rain. The “dust” part of that statement is difficult to believe, since it’s a fabric that has holes, but folks at the Alternative Energy Zone told me that they would watch white outs from inside of a shade-fabric-enclosed porch in their camp. Only a little dust came in, and the dust that did just fell to the ground because the wind had been stopped by the fabric. So the only disadvantage of shade fabric seems to be that it doesn’t protect from rain.
There are different kinds of shade fabric: woven vs. knitted vs. Aluminet, different colors (black, white, green, violet), and different amounts of light filtering (30% to 90%). The image above is 60% fabric.
 Gold lamé looks great! I’d just love to have a gold lamé dome! It wouldn’t look quite as great as this dome, but it wouldn’t cost as much.
So there’s the real question. Just how strong is gold lamé? I don’t know. (Perhaps it’s time to plan for another test to destruction.)
 Reflectix is a form of insulation. Essentially, it’s two silver space blankets sandwiching a quarter inch thick piece of bubble wrap. The advantage of Reflectix is its insulating abilities. As with gold lamé, the strength of Reflectix is an unknown. What is known is its price: it’s 2 to 5 times as expensive as shade cloth.
Cost-wise, greenhouse shade cloth is the most economical (why am I not surprised?), with 90% coverage being twice as expensive as 30% coverage. Gold lamé is about 25% more expensive than 90% shade cloth. Colored shade cloth (white, green, and violet) is a premium, with about half of the filtering that the same price of black shade cloth gives. And colored shade cloth doesn’t filter more than 60%.
So what to do? I’m leaning towards materials that are going to be used in their intended way, and that means some kind of shade cloth. Reflectix is out because it is too expensive; tarps are out because they don’t meet all of the goals. I’d really like to use gold lamé, because of how it looks, but looks are secondary. I’d rather have a black functional dome than a gold shredded one.
Then there’s the question: how do I attach the fabric to the dome? I’m still working on the answer. It probably will involve one of these.
Transportation
Look at all of this stuff! You must think I’m crazy! No one will want to lug all of these edges, vertex plates, and cover fabric into the walk-in area!
 Ah! But we don’t have to carry it. I checked with the folks at Burning Man who are in charge of the walk-in area. We can bike there; we can use carts; we can use anything that doesn’t have a motor. So put a rod through the handle of this 3′ by 5′ garden cart from Northern Tool & Equipment, and you and three of your friends can walk it and its four 5″ x 13″ pneumatic tires out to a nice, “quiet” part of the walk-in area. Cool, huh? I’ll just add wooden sides so we can pile things high to reduce the number of trips.
No materials are longer than 8′, and so everything fits in my truck bed.
Assembly
The dome height is equal to its radius, which is 13′. So assembly will be made easier by bringing my 12′ step ladder, making it possible to get up to the top of the structure without balancing on the top step of a 6′ step ladder. And hard hats! Construction crews need hard hats!

(Well, I want one.)
When we finally get around to assembling things, I recommend this sequence:
- Park the truck.
- Determine where the dome will be.
- Unload the truck and transport materials to the site.
- While that’s happening, lay out the base circle.
- Build all six pentagons.
- Raise and connect four of the lower pentagons, using push poles to hold things up. Attach the lower edges of the pentagons to the ground temporarily using spikes.
- Before attaching the fifth pentagon, move the top pentagon into the middle of the dome (we won’t be able to put it there after the fifth pentagon is in place).
- Raise and connect the fifth pentagon.
- Lift the last pentagon to vertical, oriented with a point down, and use rope or another temporary method to attach the top two corners.
- Using push poles, lift the last pentagon into a horizontal position.
- One person on the ladder inserts the bolts.
- As necessary, adjust the positions of the base pentagons, and then attach them to the ground.
- Attach the cover (method TBD).
Future Work
The biggest open question is the cover attachment method. Greenhouse shade fabric can be attached using a number of different methods, the primary method being giant bobby pins!